Geotextile Mattress Challenges and Best Installation Practices
Key Takeaways:
- Site Prep is Crucial: Poor ground prep causes big installation problems later. Needs careful grading and water management yeah.
- Handling Requires Planning: Mattresses are heavy and awkward; need the right gear and people. Don’t try to manhandle em too much.
- Fill Consistency Matters: Getting the concrete or grout mix right and filling evenly is key for performance. Bad fill means bad mattress.
- Secure Anchors & Seams: Edges and joins are weak points if not done properly, especially on slopes. Gotta be tight.
- Watch the Weather: Wind, rain, and sun can mess up installation bad. Plan around it.
- Quality Checks Throughout: Don’t wait til the end to find problems. Inspect as you go.
- Integration Needs Detail: Connecting to other stuff on site needs careful planning so water cant get through.
Installing geotextile mattresses properly is a big deal, it really is. These things are amazing for stopping erosion and keeping banks stable, but chucking them down any old how just don’t cut it. You mess up the install, you waste a whole lot of money and time, and the thing probably won’t even work right. I’ve seen it happen. Folks think it’s just rolling out carpet, but there’s way more to it. Getting it right means looking at the ground, how you’re gonna physically move and place these heavy items, what you fill em with, and how you stick em together. We’re talking about common hurdles here, the stuff that trips people up time and again, and the best ways us pros use to get past em. It’s not rocket science, but it needs care and know-how, definitely needs that. Paying attention during installation makes sure these systems do their job for years to come, protectin infrastructure and land. You can read a general overview about Geotextile Fabrics: An Overview to get some background too. This guide focuses on the ‘doing’ part – the nitty-gritty of getting that mattress in place effectively.
Site Prep Headaches: More Than Just Clearing Ground
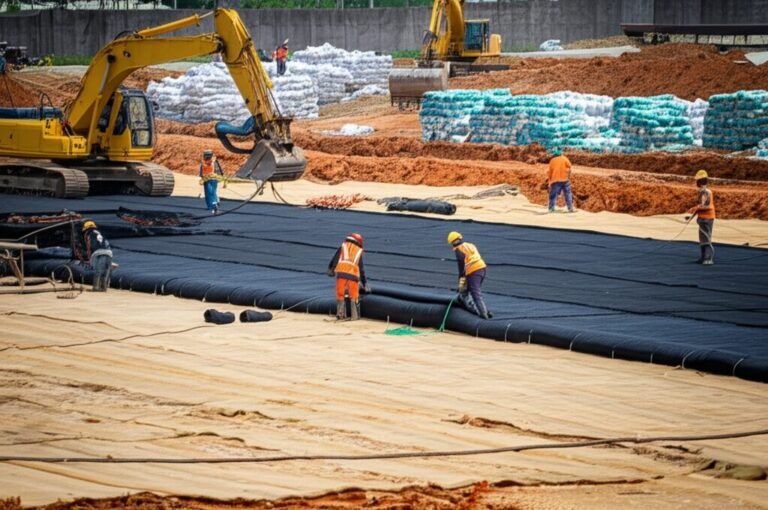
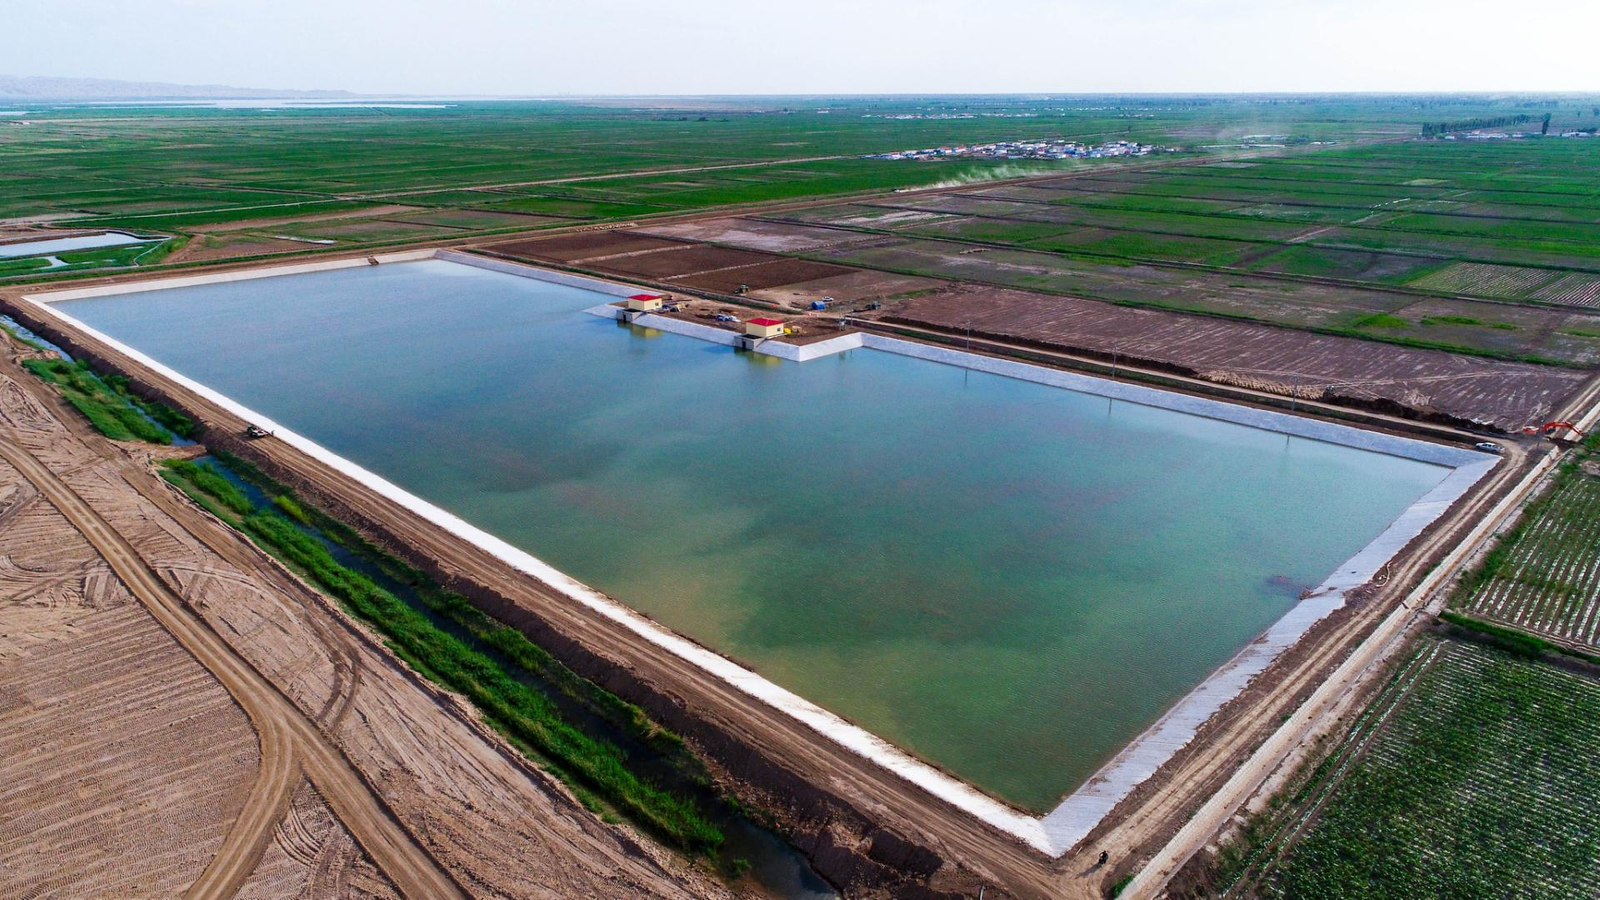
Right, first things first, the ground. You’d think just scraping the weeds off is enough, yeah? Nah, not even close. One of the biggest snags we hit is improper site prep. You gotta get that surface smooth and stable before the mattress even gets near the place. We’re talkin’ removing roots, big rocks, any sharp stuff that could poke a hole in the fabric later on. I was on a job once, up near some hills, kinda like this place:

Beautiful spot, but nightmare ground prep. Full of old construction debris buried just under the surface. The survey missed it. Caused us no end of grief tearing bits of mattress. Lesson learned: Do your homework on the site history, don’t just trust a quick walk-over. Proper grading’s essential too. You need the planned slope, nice and even, so the mattress sits snug against it. Low spots mean the fill won’t be even, high spots mean stress points. Water’s another big pain. If the ground’s soggy or you’ve got standing water where the mattress needs to go, forget about it. You gotta dewater properly. Sumps, pumps, maybe even temporary ditching. Trying to lay fabric on mud is just asking for trouble; it slips, it gets contaminated, it won’t compact right underneath. Some Common Challenges and Solutions During Geotextile Installation are site-related, so getting this bit right avoids loads of hassle later. Look at some successful Proven Geotextile Mattress Projects for Water Infrastructure – they all started with solid ground work. It ain’t the glamorous part, but it’s maybe the most vital. Get the foundation right, the rest follows much easier.
Handling the Beast: Moving and Placing Mattresses
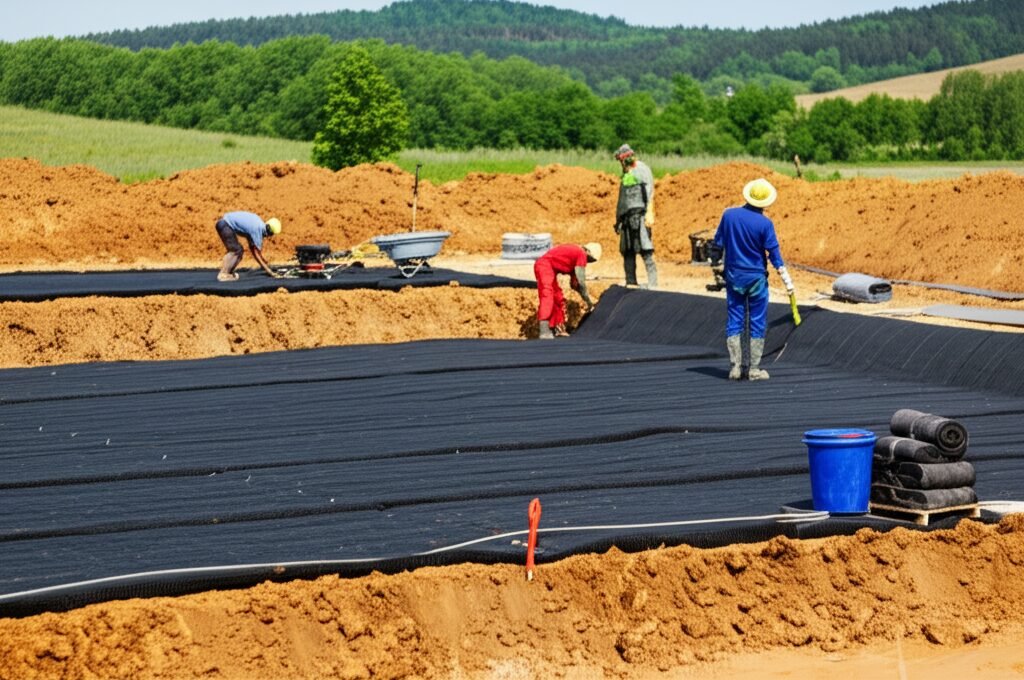
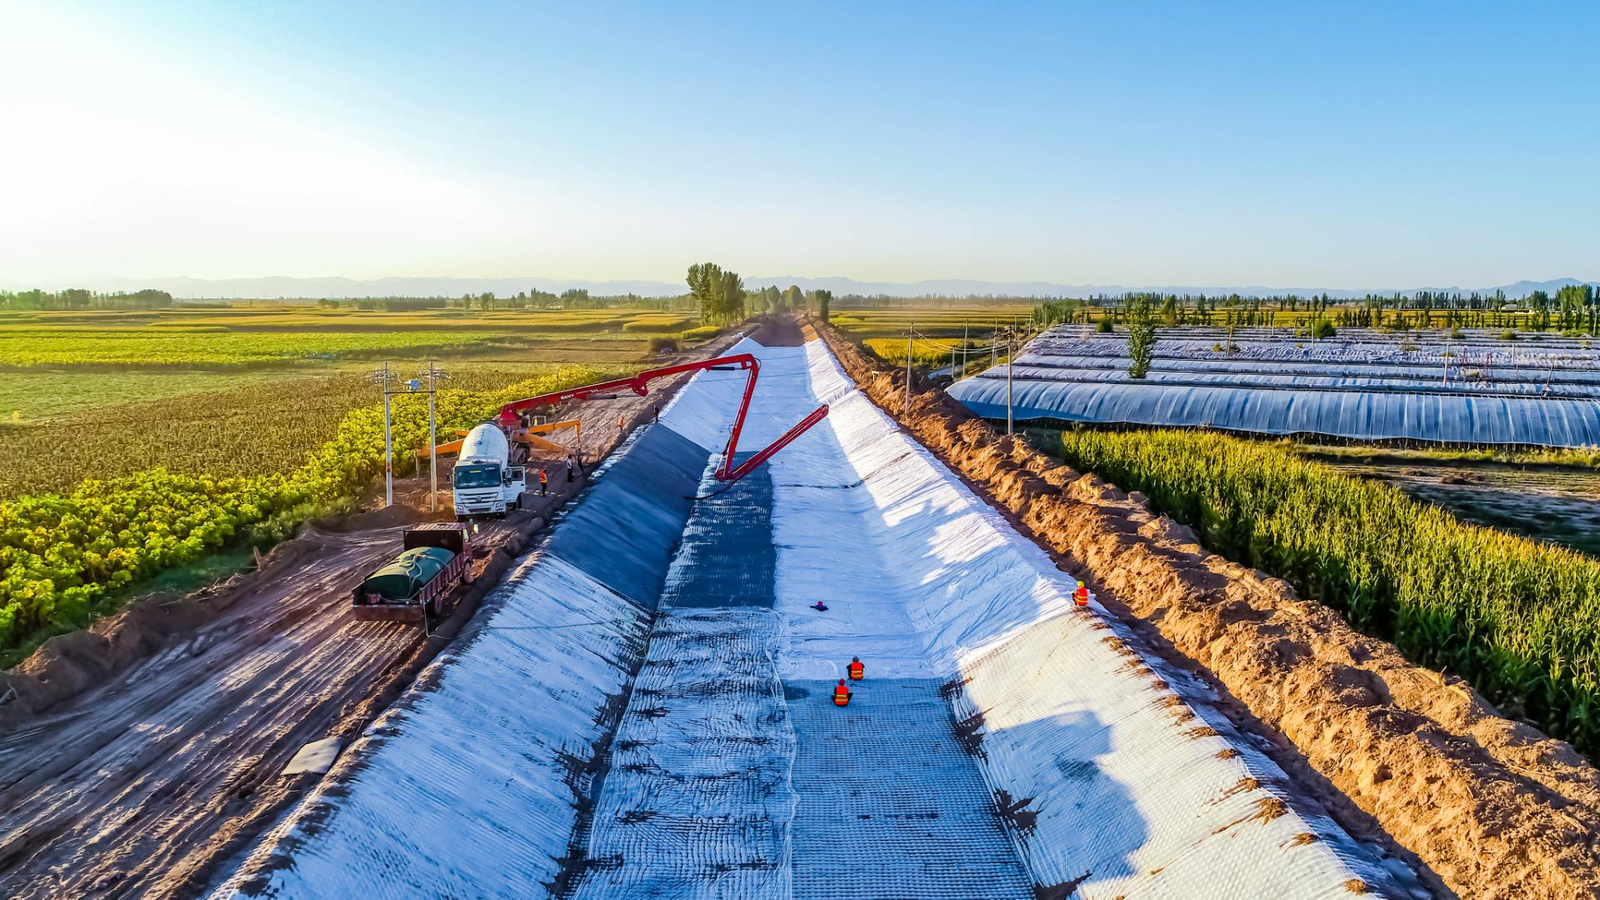
So you got the ground sorted. Now you gotta actually get the mattress in place. These things aren’t light, eh? Depending on the type and size, a roll can weigh tonnes. Trying to wrangle it with undersized gear or not enough people is a recipe for frustration and, frankly, danger. I remember watchin’ a crew once tryin’ to drag a big roll down a slope with just a pickup truck. Nearly took the truck down with it when it started sliding. Proper kit is essential. Spreader bars on excavators or cranes are usually the way to go. They let you lift the whole roll evenly and unroll it controllably down the slope or across the area.

You see these lads here? They look like they know what they’re doing, positioning it carefully. Even then, wind can be a real menace. A big sheet of geotextile acts like a sail. A sudden gust can lift it, shift it, make it impossible to position accurately. Sometimes you gotta use temporary weights or anchor pins just to hold it down til you can get some fill in. Experience counts for a lot here. Knowing how the fabric will behave, how much tension to apply, the right sequence for unrolling and overlapping panels – it comes from doing it. Different types might handle slightly different too, like the Raised-Pattern Geotextile Mattress Systems which might have specific considerations for even placement. Training your crew properly on handling procedures is super important. Don’t just assume everyone knows how to manage these big, heavy rolls safely and efficiently. A bit of planning on logistics, like where you’ll access the site from and how you’ll move rolls around, saves a load of bother on the day. A good resource like the Geotextiles Ultimate Guide 2024 might give context, but the actual handling is learned boots-on-the-ground.
Filling Fumbles: Getting the Grout or Sand In
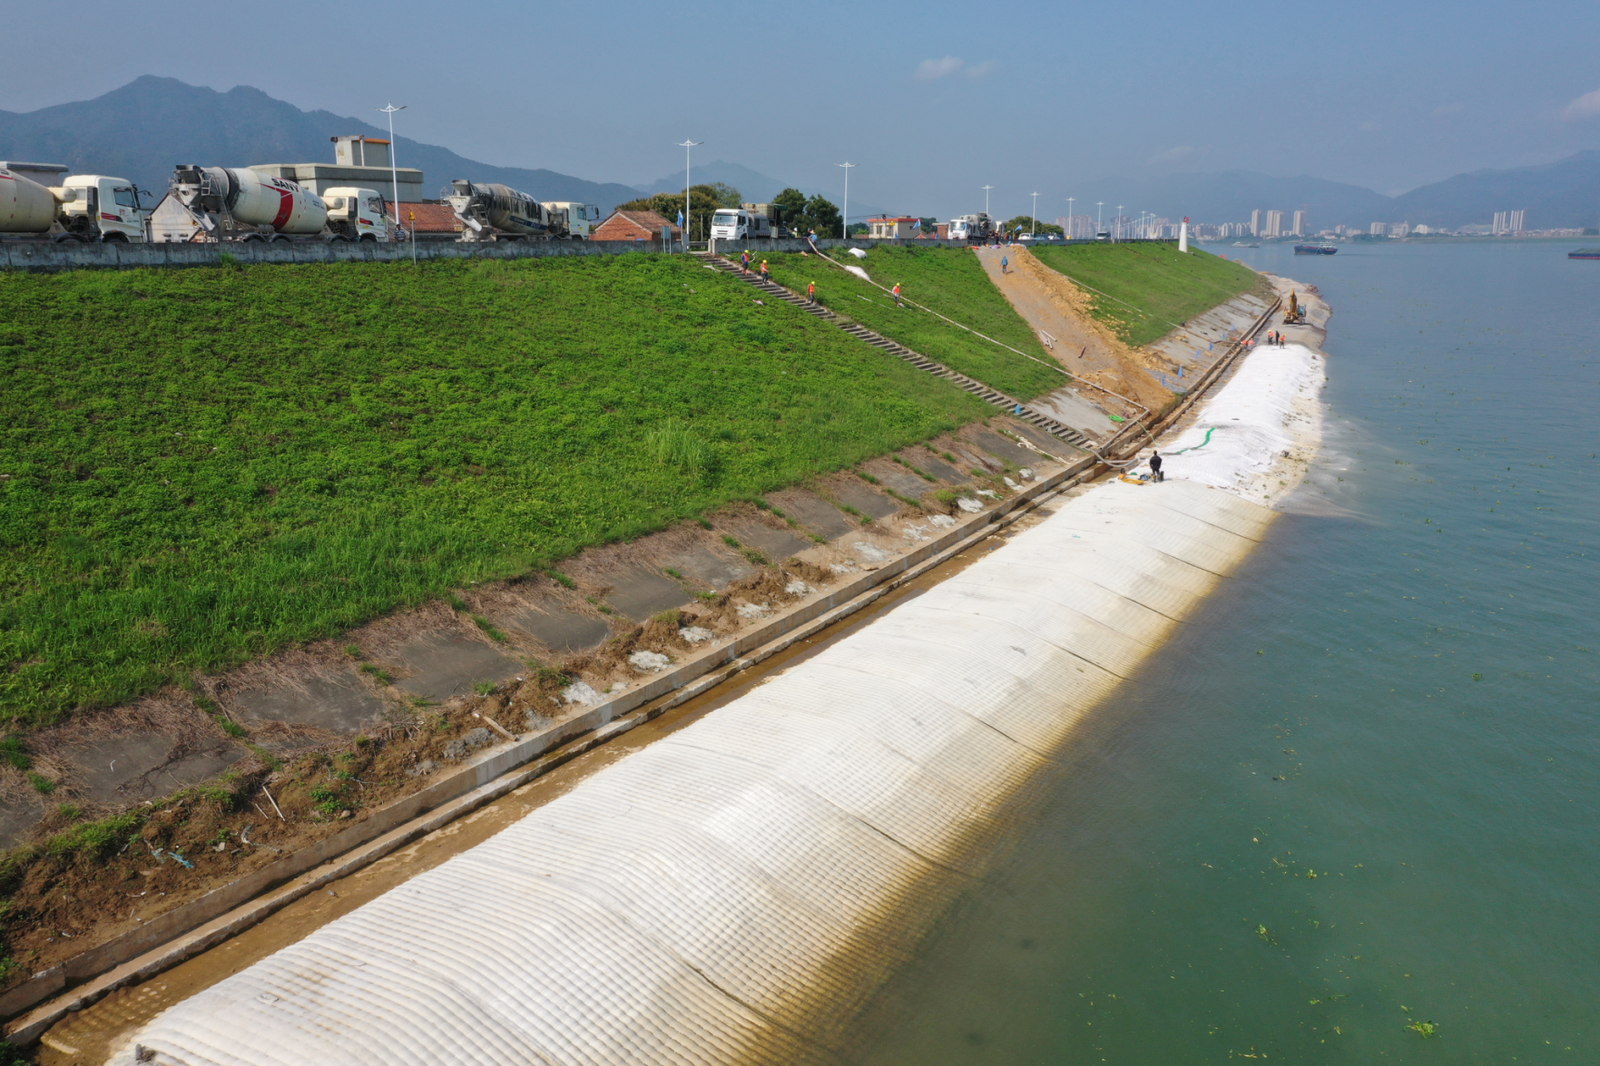
Alright, mattress is down, looks good. Now for the fill – usually concrete grout, sometimes sand or soil depending on the design, like for Advanced Filtration Geotextile Mattress Systems. This stage looks simple: pump stuff in until it’s full. But oh boy, the things that can go wrong. Number one issue? Inconsistent mix. If your grout ain’t right – too wet, too dry, ingredients not mixed properly – it’s game over. Too wet and it might just leak out or won’t set strong enough. Too dry and it won’t flow properly, leaving voids inside the mattress pockets. Seen that happen where a whole section was basically empty in the middle cos the grout was too stiff to get there. Quality control at the batch plant or mixer is non-negotiable.

This fella’s adding water, maybe part of the curing or perhaps cleaning up, but getting the initial fill into the mattress needs care. Pump clogging is another classic headache. Wrong pump type, wrong size aggregate in the mix, blockages in the hose… it all stops the job dead. Then you gotta clear the blockage, often wasting a load of grout. The actual filling technique matters too. You need a system. Start at the bottom on slopes, work your way up. Fill the compartments evenly. Don’t just stick the hose in one spot and hope for the best. You need to move it around, make sure it flows into all the corners. Sometimes gentle vibration on the outside of the mattress can help settle the grout and get rid of air pockets, but gotta be careful not to damage the fabric. If you don’t fill it completely and evenly, the mattress won’t have the weight or the strength it’s designed for. It can lead to weak spots, differential settlement, all sorts of problems down the line. There’s good info on general Geotextile Installation procedures, but the filling part needs real attention to detail on site.
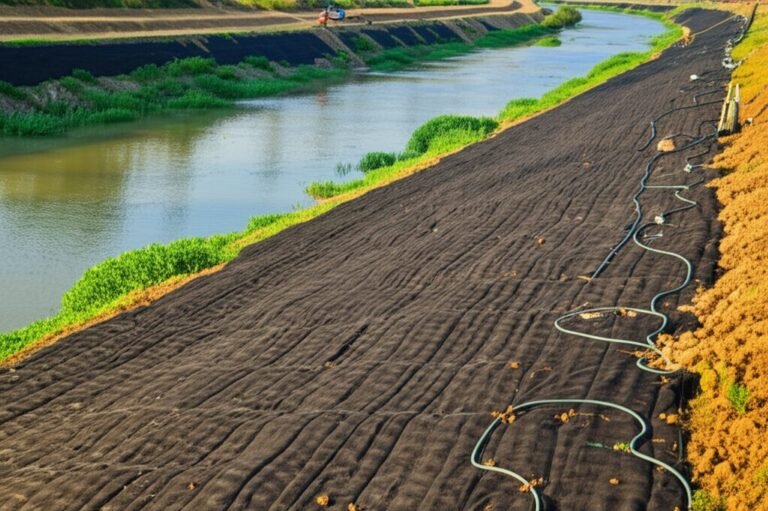
Securing Edges and Seams: No Room for Gaps
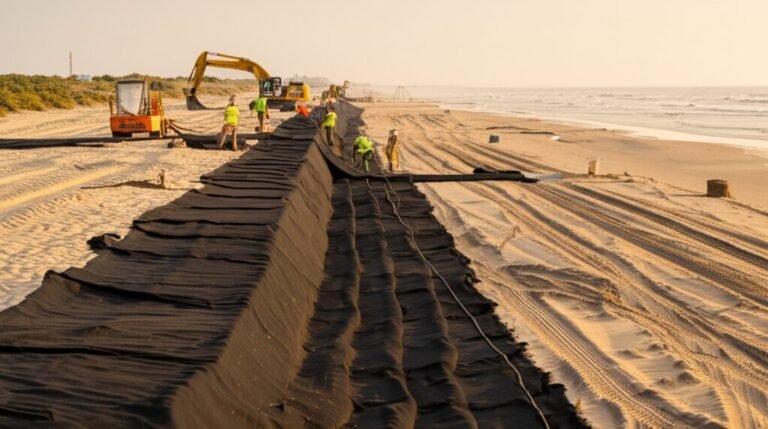
So, the mattress is laid out, maybe even filled. But it’s not truly installed until it’s properly anchored and any necessary seams are done right. The edges are a critical point. If water can get underneath the mattress edge, it’ll just start eroding there instead. That’s why we often use anchor trenches. Dig a trench along the top edge (and sometimes sides), tuck the fabric in, and backfill it securely. Sounds easy, but getting the depth and compaction of that backfill right is key. Too shallow or loose, and it won’t hold against uplift or scour. On really steep slopes or in high-flow areas, you might need extra measures like anchor pins driven right through the fabric into stable ground.

Joining panels together, making seams, is another area where things can go sideways. You need a decent overlap between adjacent panels, usually specified by the engineer. Then you gotta join ’em. Sewing is common, using special high-strength threads and portable sewing machines. Can be fiddly, especially in awkward spots or bad weather. Industrial staples are another option, quicker sometimes but gotta make sure they bite properly and don’t tear the fabric. The biggest challenge? Underwater seams. That takes specialized divers and techniques, very slow, very expensive. Avoiding underwater seams if possible through clever panel layout is always a good shout. A poor seam is just like leaving a gap – it’s a weak point waiting to fail. Water finds those gaps, believe me. For tricky projects, getting advice from specialists offering Expert Geotextile Mattress Solutions for Erosion Control can save you from costly mistakes. It’s all about creating a continuous, anchored system that water can’t undermine. Proper anchoring and seaming turns separate panels into one robust defence.
Weathering the Storm: Installation vs. Nature
You can plan everything perfectly, have the best crew, the best gear… and then the weather turns on you. Installing geotextile mattresses outdoors means you’re always kinda at the mercy of Mother Nature. Wind, as I mentioned before, is a major pain when laying out the fabric. Even moderate wind can make positioning large panels incredibly difficult and dangerous. Trying to fight a billowing sheet of geotextile is no fun and often pointless. Best practice? Check the forecast religiously. If high winds are predicted, maybe reschedule the laying part. Use plenty of temporary weights – sandbags, tyres, whatever holds it down – as soon as you get a section placed.
Rain’s another killer. Pouring rain can saturate your carefully prepared subgrade, turning it back into mud. If you’re filling with grout, heavy rain can mess with the water-cement ratio on the surface or wash away cement fines before it sets. Torrential rain could even start eroding unprotected slopes around your work area, potentially undermining the mattress edges before they’re secured. Again, scheduling is key. Try to get the mattress anchored and ideally filled during dry spells. If rain is unavoidable, temporary covers might help protect sensitive areas, but that’s often impractical on large sites. Extreme temperatures, hot or cold, also affect things. Concrete grout curing is sensitive to temperature. Working in blazing sun or freezing cold is hard on the crew too, slowing things down and increasing the risk of mistakes. For underwater work, currents and visibility are the big weather-related factors. Strong currents make positioning impossible, poor visibility makes everything harder and riskier for divers. The Geotextile Mattress Uses, Construction, Benefits & Installation Guide touches on install steps, but adapting to live weather conditions takes experience. Sometimes, you just gotta call it a day and wait for a better window. Pushing on through bad weather usually leads to poor quality work.
Making it Last: Installation Quality Control & Checks
Putting in a geotextile mattress isn’t just about getting it down and filled; it’s about making sure it’s done right so it actually lasts and performs as intended. Quality control shouldn’t be an afterthought, something you do just before you pack up. It needs to happen all the way through the installation. A common mistake is not ensuring the mattress has full, intimate contact with the subgrade beneath it. If there are big voids underneath, the mattress can’t distribute loads properly and filtration might not work as designed. Checking this as you go, perhaps using probes gently or just by careful visual inspection before filling, is important.
We talked about fill consistency, but verifying it is part of QC. Taking slump tests for grout, maybe casting test cubes to check strength later, is standard practice on bigger jobs. For sand or soil fill, checking compaction levels might be needed. Visual checks are massive thuoghout. Are the seams properly sewn or stapled? Are the overlaps correct? Are the anchor trenches backfilled and compacted? Is there any damage to the fabric – rips, tears, punctures caused during handling or filling? Found a nasty tear once after the grout was in – big repair job. Catching it early would have been simple fix. This constant vigilance is crucial. It’s also important to protect the mattress during subsequent construction phases, like careful backfilling over anchor trenches or if other machinery needs to traffic nearby. You might have expert manufacturers involved, like understanding the quality focus from people like Li Gang: Expert Geotextile Mattress Manufacturing Leader ensures the base product is good, but installation quality is down to the site team. Keeping good records, photos, and sign-offs at key stages provides backup and proof the job was done to spec. It’s about building confidence that the installed system will deliver the expected Advantages and Applications of Geotextile Mattresses in Erosion Control.
Connecting the Dots: Integration with Other Site Features
Rarely is a geotextile mattress installed in complete isolation. Usually, it needs to connect to something else – a concrete spillway, a bridge abutment, sheet pile walls, culvert headwalls, pipelines, you name it. And these connection points, these transitions, are often where problems start if you don’t detail them properly. It’s a major challenge ensuring a seamless, erosion-proof join between the flexible mattress and a rigid structure. Just butting the mattress up against a concrete wall ain’t good enough. Water will find that tiny gap, get behind the mattress, and start eroding material. Big problems follow fast.

Best practice involves careful detailing, often specified by the design engineer but needing meticulous execution on site. This might mean extending the mattress fabric up the face of the structure slightly and securing it with a mechanically fastened termination bar (like a metal strip bolted through the fabric into the structure, often with sealant). Or it could involve embedding the edge of the mattress into the concrete of the structure when it’s poured. For connections around pipes passing through the mattress, special ‘boots’ or collars made of compatible geotextile or geomembrane material are often needed, carefully sealed to both the pipe and the mattress fabric. The key is eliminating any direct path for water to get behind or under the mattress system at these junctions. This is particularly critical for specialized work involving Specialized Geotextile Protection for Critical Infrastructure, where failure at a connection point could have serious consequences. You have to think about potential settlement too – will the structure settle differently to the mattress? How will the connection accommodate that movement without tearing or opening up? It requires forethought and often custom solutions tailored to the specific interface. Documenting how these connections were made is also good practice for future inspection and maintenance.
Vegetation Establishment: The Green Finish (If Applicable)
Sometimes, especially with systems like Advanced Vegetation Geotextile Mattress Systems, the final step involves getting plants to grow. This isn’t just for looks; the roots add significant long-term stability and erosion control. But getting vegetation established on a geotextile mattress presents its own unique set of challenges. First off, the mattress design itself needs to accommodate vegetation – usually means it’s filled with soil or a soil/aggregate mix rather than solid concrete, and the fabric might have larger openings. The challenge then becomes selecting the right plant species. You need stuff that can handle the site conditions (sun, water, slope), but also species whose roots won’t damage the geotextile fabric itself. Aggressive, woody roots could potentially compromise the mattress over time. So, native grasses and specific types of shrubs are often preferred.
Getting seeds to stay put on a slope long enough to germinate can be tricky. Hydroseeding (spraying a mix of seed, mulch, fertilizer, and a tackifier) is common. The mulch helps protect the seed and retain moisture. Irrigation might be needed, especially in dry climates, during the initial establishment period. This can be a challenge on remote or hard-to-access sites. Protecting the newly seeded area from birds or washout during heavy rain is another hurdle. Sometimes temporary erosion control blankets are laid over the seeded mattress until the plants take hold. The fill material quality is critical here too – it needs enough fines and nutrients to support plant life, not just sterile subsoil. Achieving good, uniform vegetation cover takes time and sometimes a bit of follow-up work, like reseeding patchy areas. But the end result, combining the immediate protection of the mattress with the long-term reinforcement of established vegetation, provides excellent, natural-looking erosion control. Some applications, like those discussed in Geotextiles in Embankment Dams, rely heavily on that vegetative cover for surface protection.
Frequently Asked Questions (FAQ)
Q1: What’s the single biggest mistake people make installing geotextile mattresses?
A1: Probably inadequate site preparation. Trying to lay a mattress on uneven, unstable, or wet ground causes endless problems down the line. Get the foundation right first!
Q2: How heavy are these mattresses typically? Do I need special equipment?
A2: They vary a lot, but large rolls filled with concrete grout are very heavy, potentially several tonnes. You absolutely need appropriate lifting gear like excavators with spreader bars or cranes. Trying to manhandle them is usually impossible and unsafe.
Q3: Can I install a geotextile mattress underwater?
A3: Yes, it’s possible and often done for things like bridge scour protection or shoreline stabilization. However, it’s much more challenging and expensive. Requires skilled divers, specialized techniques for placement, anchoring, seaming, and filling, and often depends on water clarity and currents.
Q4: What happens if I tear the geotextile fabric during installation?
A4: Small tears or punctures should be repaired immediately, before filling if possible. This usually involves placing a patch of the same geotextile material over the hole, ensuring generous overlap, and securely sewing or sometimes heat-welding it in place. Leaving tears allows fill material to escape or soil/water to get where it shouldn’t.
Q5: How important is the grout mix consistency when filling?
A5: Extremely important. A mix that’s too wet might not achieve the required strength or could leak out. A mix that’s too dry won’t flow properly, leading to voids and incomplete filling, which compromises the mattress’s weight and integrity. Strict quality control on the grout is essential.
Q6: Do I always need an anchor trench?
A6: Usually, yes, especially at the top of slopes or along edges exposed to significant flow or wave action. The anchor trench provides crucial resistance against the mattress being lifted or undermined. The specific design (depth, width, backfill) depends on site conditions and engineering requirements.
Q7: How long does a properly installed geotextile mattress last?
A7: A long time! If installed correctly using quality materials appropriate for the site conditions, a geotextile mattress system like those from GeotextileMattress.com can last for decades, providing reliable erosion control and stabilization. Longevity depends on factors like UV exposure (if uncovered), hydraulic forces, and potential physical damage.