How to Install Geotextile Mattresses: Complete Installation Guide
Right then, let’s get this sorted. Installing geotextile mattresses ain’t rocket science, but ya gotta do it proper or it wont work right.
Key Takeaways: Geotextile Mattress Install Basics
- Site Prep is King: Clear debris, grade the slope smooth, dig your anchor trenches correct. No shortcuts here.
- Handle with Care: Don’t drag the fabric over sharp stuff. Roll it out smooth, line it up straight with the water flow or slope direction.
- Overlap Generously: Make sure sections overlap enough (check manufacturer specs, usually 300-500mm) so fill don’t leak out.
- Anchor Securely: Use enough pins/staples, especially at edges and overlaps. Backfill anchor trenches proper, compact the soil.
- Watch Your Fill: Use the right mix (grout, concrete, sand), check the consistency often. Fill evenly, don’t over-pressure the mattress cells.
- Seamless Joins: Sewing is best for strong joins between mattress sections, make sure the stitches are tight.
- Check and Maintain: Look over the job when done. Check again after first big rain or high water. Seed it if needed to help blend in.
Preparing the Site for Your Geotextile Mattress
First things first, ya can’t just chuck a geotextile Pmat down anywhere and hope for the best. The ground underneath needs lookin’ after proper like. Think of it like layin’ carpet – ya wouldn’t lay it over a bumpy, dirty floor, would ya? Same idea here. Start by walkin’ the area. Get rid of anything that shouldn’t be there – big rocks, tree roots, bits of old concrete, general rubbish. Anything sharp could potentially snag or tear the fabric later, and we definitely don’t want that. Even smaller debris can cause issues, creating lil’ voids under the mattress where water might collect or erosion could start up again unseen. So, be thorough. Really rake it over, maybe even get a metal detector across it if the site history is a bit iffy. I remember one job near an old industrial site, we were pullin’ out all sorts of metal scraps. Glad we checked!
Once it’s clear, ya gotta grade the slope. This is probably the most important bit of prep. The aim is a nice, smooth, even surface for the mattress to lie flat on. Any big humps or hollows will mess with how the mattress sits and potentially how the fill material flows into the cells later. It also affects how water flows *over* the finished mattress. If you got low spots, water could pond there; high spots might concentrate flow and cause scourin’ around the edges. Use excavators for big jobs, or just hand tools like shovels and rakes for smaller areas or touch-ups. Get it as uniform as you possibly can. Check the grade against the plans, make sure it matches what the engineers designed. Sometimes you might need ta add a bit of fill material in places to level it out – use decent quality soil, not just any old muck, and compact it down a bit.
Finally, anchor trenches. These are key for stoppin’ the mattress from slidin’ down the slope or gettin’ lifted by water flow, especially at the top edge (the crest) and sometimes along the sides or at the bottom (the toe). Dig these *before* you roll out the fabric. The size and depth depend on the site specifics – how steep the slope is, how much water flow you expect, the soil type – but typically they’re maybe 300mm wide and 300-500mm deep. Pile the soil you dig out nearby, you’ll use it later to backfill the trench once the mattress edge is placed inside. Make sure the trench walls are reasonably neat, you want good contact when you backfill. Proper site prep makes the whole installation go smoother and ensures the Soil Stabilization with Geotextile Fabrics actually works long term. It takes time, yeah, but skimpin’ here will cost ya later, guaranteed.
Unrolling and Positioning the Geotextile Fabric
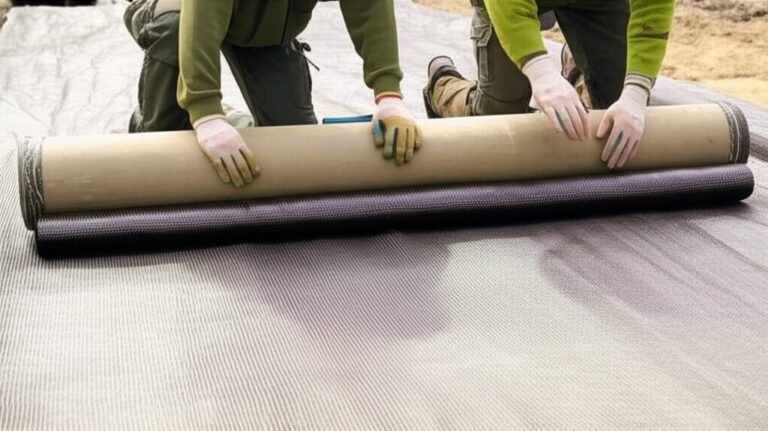
Right, site’s prepped, lookin’ good. Now it’s time to get the actual geotextile mattress fabric out. These things usually come in big, heavy rolls. Don’t underestimate ’em. You’ll likely need machinery like an excavator with spreader bar, or at least a good few pairs of hands, to handle the roll safely and get it into position. Avoid draggin’ the fabric across the ground you just prepped nice and smooth. Lift it, carry it, use protective sheeting if you absolutely *have* to drag it a short distance over a non-critical area. Treat it careful, like. Any damage now, even small tears, can compromise the whole thing later. Check the roll as you handle it, look for any transit damage. Better to spot it now than after it’s half-filled with grout.

Positioning is crucial. Usually, you want to roll the mattress *down* the slope, not across it. This lines up the main seams and the internal structure of the mattress with the direction water will flow, which is generally better for hydraulic performance. Sometimes, site layout might mean you have to go across, but down-slope is the standard go-to. Line up the first roll carefully along your starting edge, maybe usin’ string lines you set out during prep. Get it straight. Once it’s unrolled, smooth out any major wrinkles or folds. It needs to lie flat against the prepared ground. Little creases ain’t usually a problem, but big folds can create weak points or affect the fillin’ process. Use temporary weights – sandbags are good – to hold it in place while you get the next section sorted, especially if it’s a bit breezy. Wind can be a real pain with these big sheets of fabric.
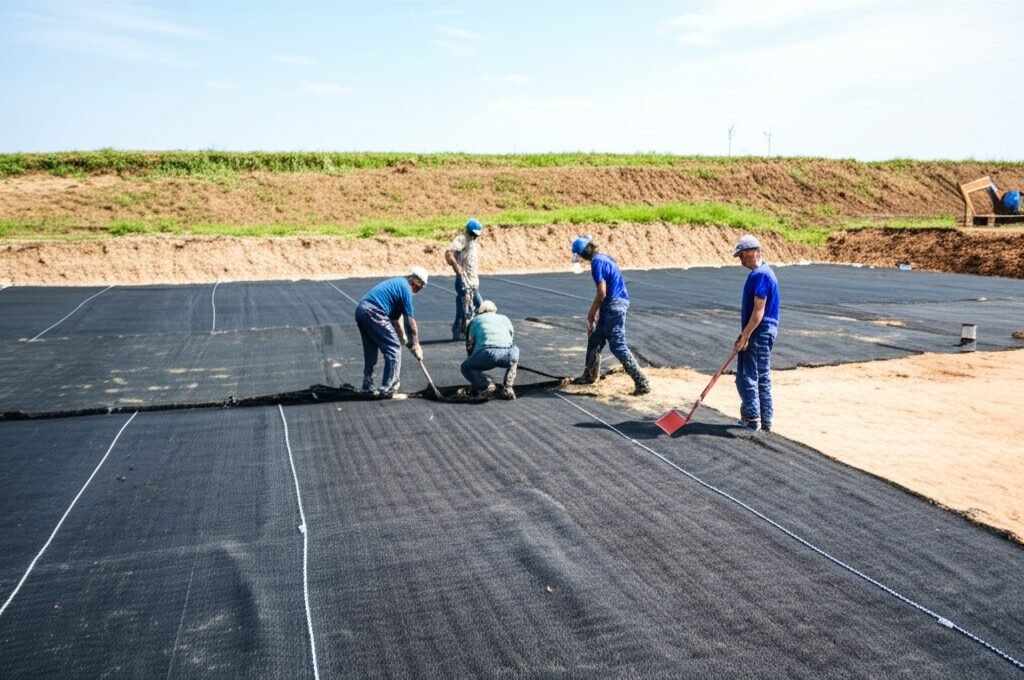
If your area is wider than one roll, you’ll need to overlap the sections. How much overlap? Check the project specs or the manufacturer’s guidelines. It’s often somewhere between 300mm and 500mm (about 1 to 1.5 feet). This overlap is super important. It stops the fill material (grout, concrete, whatever you’re using) from squeezing out between the sections. Make sure the overlap runs downhill – the edge of the upper layer should be on top of the lower layer, like roof tiles. This helps water shed off nicely instead of potentially gettin’ forced underneath the seam. Again, use temporary weights along the seam to keep it flat and in position before you start permanently securing it. Take your time gettin’ the positioning right. A few extra minutes here saves a lot of potential headaches later. It’s all about attention to detail, innit? Gettin’ the fabric laid out just right is half the battle won.
Securing the Edges and Anchoring Trenches
Okay, the fabric is laid out nice and flat, overlaps look good. Now we gotta make sure it stays put. This is where your anchor trenches and temporary fixings come into play proper. For those anchor trenches you dug earlier at the top edge (and maybe sides/toe), carefully fold the end of the geotextile mattress fabric down into the trench. Make sure it goes right to the bottom and sits snug against the trench wall. Don’t pull it so tight that it lifts the fabric off the slope behind it, but make sure there’s no slack in the trench itself. Once it’s in position, you start backfillin’. Use the soil you excavated earlier, or specified granular fill if that’s what the design calls for. Backfill in layers, maybe 150mm (6 inches) at a time, and compact each layer down. Tamp it good and firm. This mechanical anchoring provides the main resistance against the mattress slippin’ or bein’ undermined. A well-compacted anchor trench is critical for long-term Soil Stabilization with Geotextile Fabrics.
Besides the main anchor trenches, you’ll need to secure the rest of the fabric, especially overlaps and edges that aren’t in trenches. This is usually done with pins or staples. These are typically big, sturdy metal fixings – U-shaped staples or long pins with a washer head. The type and spacing will depend on the soil, the slope steepness, and the manufacturer’s recommendations. Don’t just guess. Check the spec. Generally, you’ll pin along all overlaps, making sure you go through *both* layers of fabric. Space ’em out evenly, maybe every 500mm to 1 metre (1.5 to 3 feet) along the seam. You’ll also pin along any exposed edges, like the sides if they aren’t trenched, and often across the main body of the mattress in a grid pattern, particularly on steeper slopes or areas with high water flow expected.
Drive the pins in fully so the head (or the top of the staple) is flush with the fabric, pulling it down snug against the soil. But don’t overdrive them so much that you tear the fabric around the pin head. Just firm is good. Use a mallet or hammer suitable for the pin type. If the ground is really soft, you might need longer pins or more of ’em. If it’s rocky, you might struggle to get pins in and may need to pre-drill holes or find alternative spots. It’s a bit of feel involved. Make sure the pinning holds the fabric smooth and prevents wind flap or water gettin’ underneath before the fill goes in. This temporary securing holds everything until the weight of the fill material provides the permanent ballast. Don’t skimp on the pins; they’re cheap insurance against the fabric movin’ around during the critical filling phase. Proper pinning keeps everything where it should be.
Understanding the Filling Process: Materials and Methods
Now for the bit that turns the fabric envelope into a proper mattress: the fillin’. The whole point is to fill the pockets or cells within the geotextile structure with a stable material, typically a cementitious grout or fine aggregate concrete, sometimes even just sand or gravel in specific applications. The most common is a fluid grout mix. This stuff needs to be flowable enough to pump easily and get into all the nooks and crannies of the mattress cells, but also set reasonably quickly and achieve decent strength. The exact mix design is usually specified by the project engineer. It’ll detail the cement type, sand grading, water content (the water-cement ratio is critical!), and maybe admixtures like plasticizers to help it flow without too much water. Too much water weakens the final grout. Too little and it won’t pump or fill properly. Getting the mix right is absolutely vital for the mattress to perform as intended. consistency is key – batch after batch needs to be the same.
How do ya get it in there? Usually with pumps. A grout pump is connected via hoses to injection points built into the mattress fabric itself, or sometimes you use an injection lance inserted through the fabric. The fill ports are often self-closing or need sealing afterwards. You start fillin’ typically from the bottom of the slope and work your way up. This uses gravity to help and pushes air out ahead of the grout. Fill methodically, cell by cell or section by section. You gotta control the pumping pressure carefully. Too much pressure can literally rip the mattress fabric apart or distort its shape. Too little pressure and the cells might not fill completely, leaving voids. You watch the mattress as it fills, lookin’ for it to plump up nicely to its designed thickness. You can often see the grout movin’ through the fabric. It requires a bit of experience to know when a cell is perfectly full.
Keep an eye on the whole mattress during filling. Look for leaks at seams or from the fill ports. Have some clamps or ties ready to pinch off any unexpected leaks quickly. Check the thickness using a simple probe or by eye against marked stakes. Avoid overfilling – you want the mattress to conform to the ground, not balloon up rigidly. If it’s a big area, you might need multiple pumps or work in stages, allowing one section to partially set before starting the next to avoid excessive fluid pressure buildup. The weather plays a part too. Filling in really hot weather can make the grout set too fast, potentially causing pumping issues or cracks. Cold weather slows the set time. Rain can wash out cement if the grout hasn’t set. So, plan your filling operations considerin’ the forecast. Gettin’ the fill right transforms the fabric into a solid, protective layer.
Joining Geotextile Mattress Sections Together
Sometimes, the area you need to cover is bigger than even the largest standard roll of geotextile mattress. In these cases, you gotta join multiple sections together, not just overlap them side-by-side, but sometimes end-to-end or in more complex shapes to fit the site contours. Just overlapping might not be strong enough, especially if the join is gonna be under stress from water flow or ground movement. The fill material puts internal pressure on the seams, so they need to be properly constructed to hold everything in. Think of it like sewing pieces of cloth together to make a bigger sheet – same principle, just heavy duty.
The best way, the strongest way, to join geotextile mattress sections permanently is usually by sewing. You’ll use industrial sewing machines specifically designed for heavy geotextiles. These use tough, UV-resistant thread, commonly polyester or polypropylene, that’s compatible with the mattress fabric itself. The stitch type is important too. Often a double-stitched seam, maybe a prayer seam or a J-seam, is specified to give maximum strength and make sure grout can’t easily leak through the join. You need to make sure you have the correct overlap between the pieces being sewn, as per the manufacturer’s instructions, usually that 300-500mm again. The sewing needs to be done carefully, with consistent tension and stitch spacing. Any missed stitches or loose sections are potential weak points. This sewing is often done *before* the sections are filled, either on-site just before final positioning, or sometimes pre-fabricated off-site if the layout is known well in advance.
What if you can’t sew on site, or it’s just a smaller join needed? Sometimes tying or mechanical fastening is used, though it’s generally considered less robust than a properly sewn seam for high-stress areas. This might involve punching holes along the overlapping edges and using heavy-duty cable ties, hog rings, or specific geotextile fasteners to clamp the layers together. If using ties or rings, the spacing needs to be close enough to prevent grout leakage – much closer than the pinning spacing used for temporary fixing. You really gotta make sure that overlap is held tight along its entire length. Another method sometimes seen, particularly for joining the *ends* of filled sections, involves creating a sort of formwork or transition zone, maybe using bags filled with grout or soil, to bridge the small gap and prevent erosion at the joint. But for creating large, continuous mattress areas before filling, sewing is really the preferred method for structural integrity. A good join means the whole system acts as one monolithic layer once filled.
Key Considerations for Effective Geotextile Mattress Erosion Control Methods
Okay, so the mattress is down, pinned, maybe sewn, and ready for fill (or is already filled). But what makes it actually *work* long-term for erosion control? It’s not just about plonking it down. There’s a few key things to keep in mind, things that make the difference between a successful job and one that fails in the first big storm. These are based on solid engineering principles but also, frankly, a lot of practical experience seein’ what works and what don’t. One of the main things is how the mattress interacts with water flow. The design needs to consider the expected velocity and volume of water. Is it steady flow like in a channel lining, or turbulent flow like on a coastal revetment hit by waves? The thickness of the mattress, the strength of the fabric, and the weight of the fill material all need be matched to these hydraulic forces. A mattress that’s too thin or too light could get lifted or damaged. The surface finish matters too – some mattresses are designed to be relatively smooth, others have a more textured finish to slow down water flow slightly or help vegetation establish.

Another big factor is how the mattress edges are treated, especially the termination points. We talked about anchor trenches at the top. Ya also need proper termination at the sides and the toe of the slope. If water can get underneath the edge, it *will* start scouring away the soil, potentially undermining the whole structure. Side edges often need anchor trenches too, or sometimes they might butt up against a solid structure like a wall. The toe, where the mattress meets the bottom of the channel or the shoreline, is super critical. It often needs extending beyond the immediate erosion area or incorporating into a deeper toe trench filled with rock or grout to prevent undermining as the channel bed shifts over time. Just ending the mattress vaguely at the bottom isn’t good enough. It needs designing proper, these Geotextile Mattress Erosion Control Methods are only as good as their weakest point, which is often the edges.
Finally, think about what happens *after* installation. Many geotextile mattresses are designed to allow or even encourage vegetation growth through the fabric or in soil pockets incorporated into the design. This vegetation provides extra erosion protection, helps the mattress blend into the landscape, and improves biodiversity. If vegetation is part of the plan, you need to consider how it’ll establish. Does the fill type support growth? Do you need to add topsoil over or within the mattress? What kind of seed mix is suitable for the local climate and conditions? Sometimes, the mattress just acts as permanent armour, especially in very high-flow channels or marine environments where plants won’t survive. But where possible, integrating vegetation makes for a more resilient and environmentally friendly solution. Considering these factors – hydraulics, edge details, and post-installation integration – is key to making sure the geotextile mattress does its job effectively for years to come. You see some parallels in other construction sectors too, like glass installation where edge sealing is critical – reports like the Glass Glazing Contractors in the US – Industry Market Research Report often highlight the importance of proper installation techniques for long-term performance.
Common Mistakes During Installation and How to Avoid ‘Em
Been doin’ this a while now, and ya see the same slip-ups happen time and again. It’s usually not complicated stuff, just basic things missed in a rush or through lack of experience. Avoidin’ these common mistakes can save a lot of bother, and money, down the line. Probably the number one cock-up? Poor site preparation. We talked about it first for a reason. Folks try to save time by not clearing all the debris properly, or they don’t grade the slope smooth enough. Then the mattress sits unevenly, it gets punctured by hidden rocks, or water flows underneath it in unexpected ways. The fix? Don’t rush the prep. Walk the site thoroughly *after* clearing and grading. Use a string line or laser level to check for smoothness. It pays off.
Another classic is improper anchoring and edge treatment. Forgetting the anchor trench at the top, or not digging it deep enough, or not compacting the backfill properly. Using too few pins, or the wrong type for the soil conditions. Not overlapping sections enough, or overlapping them the wrong way (uphill instead of downhill). These all lead to the mattress potentially movin’, liftin’, or havin’ fill leak out. Remember one job on a canal bank, the crew hadn’t pinned the overlaps tight enough. When the grout pump started, the pressure just forced the seam open and grout went everywhere *except* inside the mattress cell. Messy and expensive to fix. How to avoid? Follow the plan! Check the required overlap distance, pin spacing, and anchor trench dimensions. Double-check the overlap direction. Compact that backfill like ya mean it.
Then there’s mistakes during the fillin’ process. Using the wrong grout mix is a big one. Maybe the water-cement ratio is off, making it too weak or too stiff to pump. Or the sand is the wrong grade, causing blockages. Always, always do a test mix first if possible, and check consistency throughout the pour. Another fillin’ error is pumpin’ too fast or with too much pressure. It’s tempting to get the job done quick, I know, but blowin’ out a seam or distortin’ the mattress is a major setback. Monitor the pressure gauge on the pump, watch the mattress itself for signs of distress. Fill evenly and steadily. Also, make sure air can escape properly as the grout goes in – blocked air vents or improper fill sequence can lead to voids. Avoiding these common pitfalls mostly comes down to careful planning, followin’ the specifications, and paying attention to detail during each step. Experience helps too, of course! Just like in any manufacturing or install process, whether it’s geotextiles or materials discussed in the Glass Manufacturing Global Market Report, quality control at each stage prevents bigger problems later.
Post-Installation Checks and Maintenence
Alright, the mattress is installed, filled, lookin’ pretty solid. Job done? Not quite. There’s still a couple of crucial steps: checkin’ everything over properly and thinkin’ about any long-term maintenence needed. Immediately after the fill has set (give it enough time based on the grout mix and weather, could be a day, could be several), walk the entire installation. Look close. Are there any visible tears or damage to the fabric that happened during filling? Any signs of grout leakage at seams or fill ports that need patching? Check the anchor trenches – has any settlement occurred that needs topping up and re-compacting? Look at the overlaps and pinned areas, make sure everything is still snug and secure. Check the overall shape and thickness, does it match the design intent? Did any areas under or overfill significantly? It’s much easier to fix minor issues now than after the first flood event reveals a problem.
A really important check is after the first significant ‘event’ – usually the first heavy rainfall or period of high water flow that the mattress was designed to protect against. Go back out and inspect it again. How did it perform? Is there any sign of erosion starting at the edges, especially the toe? Has any soil scoured out from underneath the mattress anywhere? Did the water flow over it as expected, or did it cause unexpected turbulence or eddying? This first real-world test is invaluable. If you see any minor issues starting, like a bit of undermining at one edge, you can address it relatively easily with some extra rock protection or minor regrading. Leaving it will just let it get worse. Document what you find, maybe take photos. This info is gold for future similar projects too.
Long-term maintenence depends a lot on the site and the type of mattress. If it’s designed to be vegetated, then maintenence might involve checkin’ on plant establishment, maybe reseeding bare patches, or controllin’ invasive weeds. Healthy vegetation cover adds a lot to the erosion resistance. If it’s an un-vegetated, hard-armour type mattress, maintenence is usually minimal. But periodic inspections, maybe annually or after major floods/storms, are still a really good idea. Look for any cracking or spalling of the grout (unlikely if the mix was right, but possible over many years), check for undermining at the edges, make sure debris hasn’t built up in a way that obstructs flow. Just keepin’ an eye on it ensures it continues to provide the protection it was installed for. Think of it like checkin’ the foundations of a building – essential for long-term performance. Keeping up with industry changes, like those perhaps highlighted in the 2025 Top Glass Fabricators Report for their sector, helps anticipate future maintenence needs or potential upgrades in materials tech over time. Similarly, understanding wider industry trends, maybe from sources discussing Glass Industry Trends and Predictions for 2025, gives context to the evolving world of construction materials.
Frequently Asked Questions (FAQs)
Q1: How long does a geotextile mattress typically last?
A1: Depends loads on the site conditions (water flow, UV exposure, soil type) and the quality of the installation, but a properly installed mattress filled with concrete/grout can last decades, often 50 years or more. If it gets vegetated, that can help extend its life too by protectin’ the fabric from sunlight.
Q2: Can you install a geotextile mattress underwater?
A2: Yeah, definitely. It’s often used for bridge scour protection or lining channels underwater. You need special techniques, obviously. Divers might be involved to position and secure the fabric. The fill material (usually grout) needs to be able to displace water and set underwater, which often means specific admixtures. Pumping techniques are also adapted for underwater work.
Q3: What’s the difference between a geotextile mattress and just dumping rock riprap?
A3: A geotextile mattress provides a more controlled, engineered solution. It’s flexible before filling, so it conforms better to the ground shape. Once filled, it forms a continuous, interlocked layer that’s often more resistant to high flows than loose rock, which can get pushed about. Mattresses can often achieve the same protection with less thickness and weight than riprap, and they can also be designed to vegetate, makin’ ’em look more natural. Riprap can be cheaper for some jobs, though, especially if good rock is readily available.
Q4: What happens if the fabric gets torn during installation?
A4: Small tears found *before* filling can often be repaired. Depending on the size and location, you might sew a patch over it using compatible geotextile fabric and thread, or use specialized adhesive tapes. If a tear happens *during* filling and grout starts leaking, you gotta stop pumpin’ immediately in that area and try to clamp or patch the leak quickly before continuing carefully. Significant damage might mean replacing a whole section, though.
Q5: Do you need specialist equipment to install geotextile mattresses?
A5: For bigger jobs, yeah. You’ll need machinery like excavators for site prep and handling the heavy rolls. You’ll definitely need a grout pump and mixing equipment if you’re using a cementitious fill. For sewing seams, you need industrial sewing machines. For smaller projects, maybe hand tools for prep and pinning, and potentially ready-mix grout delivery could work, but you still need a way to pump it into the mattress cells controllably. It’s not typically a DIY job for anything other than maybe very small garden features.